Taiwanese Beef Noodles made with Dutch oven

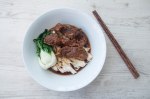
My go-to recipe for a hearty meal full of braised tender beef, vegetables and plenty of carbssss!

Sluuuurp~


Ingredients:

  • 2 pounds meaty beef short ribs
  • 2 onions
  • 2 tomatoes
  • 3 slices of peeled fresh ginger, smashed
  • 1 bunch scallions, white parts smashed with flat side of a large knife and green parts chopped
  • 1.5 cup Chinese rice wine
  • ¾ cup soy sauce
  • 1 fresh red chile
  • 3 tablespoons of Doubanjiang
  • 3 cups of water
  • 1 teaspoon of freshly grinded pepper
  • 2-3 cubes of rock sugar
  • 10 ounces dried Chinese wheat noodles
  • Bok Choy for garnishing

Directions:

  1. Preheat oven to 180 deg C.
  2. Cut onions and tomatoes into wedges, scallions into sections.
  3. Chop short ribs into 3-inch cubes.
  4. Heat the olive oil in a large Dutch oven. Add the onions, tomatoes, scallions and ginger slices and cook over medium heat for 10 minutes, stirring occasionally, until the onion is lightly browned.
  5. Dry the beef cubes with paper towels. Toss into the Dutch oven, sear the beef in the hot oil for 3 to 5 minutes, turning to brown on all sides.
  6. Add the soya sauce, water plus Chinese rice wine, just enough to almost cover the meat.
  7. Add the rock sugar, pepper and Doubanjiang , toss in red chili. Bring to a simmer.
  8. Cover the pot with a tight-fitting lid and place it in the oven for about 2.5 hours or until the meat and vegetables are very tender when pierced with a fork.
  9. Serve with noodles and bok choy!


Advertisement

Cod en Papillote with Tomatoes and Olives

The name of the dish sounds a lot more fancy than it actually is—ingredients are simply wrapped into a paper parcel and then baked.

En papillote translates to “in parchment.”  When ingredients such as fish, seafood and vegetables are sealed in a parchment paper parcel with herbs or other seasonings, it creates an aromatic, moist heat where the protein cooks in its own juice as well as the essences from other ingredients.

Ummm… So easy and so delicious!
The only thing to remember is to seal your parcel well, so that none of the delicious juices can escape!

Ingredients:

    • Parchment paper
    • 2 cod fillets
    • 2 tablespoon olive oil
    • 2 cloves garlic (thinly sliced)
    • 1/2 cup grape tomatoes, halved
    • 6 large, pitted olives
    • 1/2 teaspoon kosher salt
    • 1/4 teaspoon freshly ground black pepper
    • 4 teaspoons dry white wine
    • 2 teaspoons unsalted butter
    • 2 fresh thyme sprigs

Directions:

  1. Heat oven to 240°C
  2. Place the fish fillet on the parchment. Season with salt and pepper.
  3. In a small skillet, warm 1 tbsp oil over medium heat. Sauté sliced garlic until golden.
  4. Remove skillet from heat; stir in tomatoes and olives. Divide tomato mixture among fish.
  5. Top fillets with wine, butter and thyme sprigs.
  6. Bring the edges of the baking paper together and fold over twice to enclose. Twist and tighten both sides with string to form a sealed parcel.
  7. The parcel should look like a giant sweet. Bake for 8-10 minutes.


Lemon Blueberry Loaf Cake

Moist, flavorful and delicious- a classic combo that everyone loves!

DSC_0868DSC_0857DSC_0900DSC_0878


Ingredients:

  • 1 and 1/2 cups self-rising flour
  • 1 teaspoon salt
  • 1/3 cup canola oil
  • 1 cup sugar
  • 2 large eggs (at room temperature)
  • 1 Teaspoon vanilla extract
  • 1 cup plain Greek yogurt, room temperature
  • lemon zest and juice from 1 lemon
  • 1 cup fresh blueberries
  • 1 Tablespoons all-purpose flour

Lemon glaze

  • 2 Tablespoons butter, melted
  • 1/2 cup powdered sugar
  • 2 Tablespoons fresh lemon juice
  • 1/2 teaspoon vanilla extract

Directions:

  1. Preheat oven to 180deg C and slightly grease a 9″x 5″ loaf pan with butter.
  2. In a medium bowl, whisk together flour and salt. Set aside.
  3. Combine the wet and dry ingredients using a spatula just until smooth. Be careful not to over-mix.
  4. Toss fresh blueberries together with one tablespoon of flour.  This flour coating will help prevent the blueberries from sinking to the bottom of your loaf while baking.
  5. Add the flour coated berries to the batter and fold gently to combine.
  6. Pour batter into prepared pan and bake for 50-60 minutes, or until a toothpick inserted in the center of the loaf comes out clean.
  7. Cool bread in the pan for about 20 minutes, then move to a wire cooling rack with a baking sheet below (to catch the glaze you’re about to add).
  8. Prepare glaze by simply whisking together the melted butter, powdered sugar, lemon juice and vanilla; then pour glaze over the loaf.  Allow to set a few minutes.


Cherry Cream Cheese Danishes

This, friends, is the moment we’ve been waiting for- spring is finally here! Beach vacation, sunshine, and sandal season are right around the corner. As the day gets longer, it’s the time to get outside and enjoy the warm weather (instead of working in the kitchen). For a quick springtime snack, light and easy is the name of the game. With this recipe, you can pull off some bakery-worthy pastries at home in just 30 minutes. Perfect for any time of the year, but I swear: they just taste better in spring!

DSC_0844.jpg


Ingredients

  • 1 sheet puff pastry (thawed)
  • 1 pack Cream Cheese (8 ounces), softened
  • 4 Tbsp Sugar
  • 1 Tbsp Vanilla extract
  • 1 cup canned Cherry Pie Filling
  • Icing sugar for garnishing

Directions

  1. Preheat oven to 200 degrees Celsius. Line a baking pan with parchment paper.
  2. Take out a sheet of puff pastry and thaw for 10min.
  3. Cut the sheet into 6 equal pieces.
  4. With a knife, score ½” border around the edge of each piece of puff pastry. Use a fork to make five or six pricks into the area within the border (this will stop the center of the dough from rising).
  5. In a bowl, mix together cream cheese, sugar, and vanilla.
  6. Spoon about 2-3 tablespoons of mixture into the middle of each piece of dough and spread around evenly.
  7. Add about 6 cherries into the middle of the cream cheese.
  8. Bake for 20 minutes. Sprinkle with icing sugar before serving.


Crumbliest Scones

These are essentially British, delicious and simple to make… Get baking and fill your home with the smell of freshly baked scones!

scone illustration

It is no secret that I have always wanted to open my own cafe. And this is the sign that I will put up at the storefront when a batch of scones are hot and ready (Yes! I stole the idea from Kripsy Kreme’s neon sign!!).

scones

sconeeee.jpg


Ingredients (serves 8):

  • Plain flour, for dusting
  • 1.5 cups self-raising flour
  • 40g butter, softened and cubed
  • 3/4 cups milk
  • 1 cup dried fruit, e.g. cranberries/ raisins (optional)

Directions:

  1. Preheat oven to 200°C. Sift self-raising flour into a large bowl.
  2. Rub butter into flour using your fingertips, until mixture resembles breadcrumbs.
  3. Make a well in the centre. Add milk and mix until mixture forms a soft dough. Add in dried fruit if any.
  4. Knead gently until smooth (don’t overwork the dough or scones will be tough).
  5. Pat dough into 2cm-thick. Cut out 8 rounds using a 5cm round cutter.
  6. Place scones onto baking tray, 1cm apart. Sprinkle tops with a little plain flour.
  7. Bake for 20 to 25 minutes or until golden and well risen.
  8. Serve warm with jam and cream.

Teriyaki Chicken puff pastry pizza

As much as I love pizza, tell me any pizza recipe that requires a rolling pin and I’ll probably respond with an eye roll. Tell me I have to let the dough rise for an hour after a long day of work and I’ll probably say, “Nope, not happening.” The truth is… an amateur chef with a full-time job can’t afford spending two hours on making her dinner!

Are you looking for yummy and instant pizza recipes just like me? If yes, you have come to the right place. This recipe needs no kneading or rising time. You can make this pizza in less than the amount of time it would take for pizza delivery. Voilà, dinner is ready!


Ingredients:

  • 1 sheet store-bought puff pastry, thawed
  • 1 cup chicken (diced and seasoned with salt and pepper)
  • 1 cup mozzarella cheese, shredded
  • 1 teaspoon finely chopped spring onions
  • Teriyaki sauce
  • 1 Tablespoon sake
  • 2 Tablespoons soy sauce
  • 2 Tablespoons brown sugar
  • 2 Tablespoons water

Directions:

  1. Preheat oven to 210 degrees Celsius. Place defrosted sheet of puff pastry onto the parchment.
  2. Sauté chicken slightly, for 2min, under medium heat.
  3. Combine Teriyaki sauce ingredients in a bowl. Add the teriyaki sauce to the chicken, cook until the sauce is thickened and glossy, stirring occasionally, for around another 3 minutes.
  4. Remove the chicken from the sauce.
  5. Spread the teriyaki sauce onto the puff pastry, leaving a ½ ” border around the edges.
  6. Distribute chicken evenly over teriyaki sauce then top with shredded mozzarella.
  7. Bake for 15-20 minutes until the cheese is bubbly and just beginning to brown and the pastry crust is golden brown.
  8. Remove from oven and let cool for 2 minutes before sprinkling with chopped spring onions.


Rustic New York Style Cheesecake


Phew! I survived another V-day! Never have been a big fan of this “Hallmark holiday”, I sometimes like to think of myself as a Valentine’s day scrooge with a secret desire to ruin everyone else’s best laid plans (like booking every other seat in the cinema so couples can’t sit together!!). That being said, I think romance and love and caring and all those gushy sweet feelings we have for others should be celebrated every day… Why not start doing so by making this cheesecake for your loved ones?

Because a piece of classic New York cheesecake- likes any great love, never goes out of style. ❤

p.s. I like to have mine looking all rustic, cracked and glorious… but do feel free to add any toppings you like!

Yield an 8-inch cake (3 inches in height)

Ingredients:

Crust-

  • 16 digestive crackers, crushed  
  • 3 tablespoons butter, melted  

Filling-

  • 3.5 (8 ounce) packages cream cheese  
  • 1 1/4 cups white sugar
  • 3/4 cup milk
  • 4 eggs
  • 1 cup plain yogurt
  • 1 tablespoon vanilla extract  
  • 1/4 cup all-purpose flour

Directions:

  1. Preheat oven to 180 degrees C. Grease a 8-inch pan.
  2. In a medium bowl, mix digestive cracker crumbs with melted butter. Press onto bottom of pan.
  3. In a large bowl, mix cream cheese with sugar with hand mixer until smooth. Blend in milk, and then add in the eggs (one at a time), mix until just incorporated.
  4. Add in plain yogurt, vanilla and flour, mix until smooth. Pour filling into prepared crust.
  5. Bake in preheated oven for 50min. Turn the oven off, and let cake cool in oven with the door closed for 2 hours to prevent cracking.
  6. Sprinkle icing sugar on top. Chill in refrigerator until serving.

No-peel Apple Cream Cheese Tart

Ask anyone who knows me and they will tell you that I am a BIG sucker for apple tarts. Indeed, I like all sorts of apple desserts- apple turnover, tarte tartin, apple strudel, etc etc… As much as I like these aromatic pastries filled with the unmistakable scent of cinnamon, I seldom make them on my own because I hate peeling apples!!! So you can probably imagine my excitement when I stumbled upon this no-peel apple tart recipe. ♥

Happy baking everyone!


Pastry:

  • 250g plain flour, plus extra for dusting
  • 70g icing sugar
  • 125g unsalted butter, cubed
  • 1 egg yolk
  • Beans for baking

Filling:

  • 4 ounces cream cheese, at room temperature
  • 1/2 cup granulated white sugar
  • 2 large eggs, at room temperature
  • 2/3 cup cream
  • 1 teaspoon pure vanilla extract
  • 1 teaspoon grated lemon

Topping:

  • 3 apples (cut into 8 -12 slices each)
  • 4 tablespoon brown sugar
  • 2 tablespoon unsalted butter
  • 2 teaspoon cinnamon
  • 1 tablespoon lemon juice

Directions:

  1. Preheat oven to 160C fan.
  2. To make the pastry, mix the flour and icing sugar in a bowl. Rub the butter into the flour with your fingers until crumbly.
  3. Mix in the egg yolks, roll into a ball. If the pastry is still too dry, add 1-2 tbsp water until it comes together.
  4. Place the pastry in your tart pan and, using your fingertips; evenly press the pastry onto the bottom and up the sides of your pan. Gently pierce the bottom of the crust with the tines of a fork. (This will prevent the pastry crust from puffing up while it bakes.)
  5. When ready, place the tart pan on a larger baking pan and bake until the crust is golden brown, about 13 – 15 minutes. Remove from oven and place on a wire rack to cool while you make the filling.
  6. Beat cream cheese using a hand mixer until smooth. Add sugar gradually until incorporated. Add eggs (one at a time) until thoroughly combined.
  7. Add the remaining ingredients and beat until well blended and smooth.
  8. Carefully pour the filling into the pre-baked tart shell and then bake the tart for about 30 – 35 minutes or until the filling is set. Transfer tart to wire rack to cool and start making the topping.
  9. Melt the butter in a large skillet over medium heat. Add the apples to the pan and sprinkle with 2 tablespoon brown sugar. Sauté the apples, frequently stirring, for 6 to 8 minutes until they just begin to turn tender. (Be careful not to overcook at this stage as the apples may become puree!)
  10. Sprinkle the apples with the remaining sugar and add cinnamon. Toss the mixture gently and cook over medium heat for an additional 1-2 minutes until the sugar begins to caramelize, and the apples are crisp-tender.
  11. Arrange the apple slices in an overlapping spiral pattern. Pour the remaining caramel sauce on top of the apples.
  12. Chill in the refrigerator for 1 hour before serving!

Dutch Baby with Blueberry Compote

I’ve always been amazed by how many different breakfast food you can create using just milk, eggs, and flour; here is one of the more interesting examples.

Oh, did i mention that everything comes together in about 30 blessed minutes?

dsc_0807dsc_0810


Ingredients:

Batter:

  • 3 eggs
  • 3/4 cup flour
  • 3/4 cup whole milk (warmed)
  • 1 tablespoon sugar
  • 3 tablespoons butter
  • 1 tablespoon vanilla extract
  • Pinch of salt

Blueberry compote:

  • 1.5 cup fresh blueberries
  • 1/4 cup sugar
  • Grated zest and juice of a lemon
  • Powdered sugar,for dusting

Vanilla Ice Cream (optional)

Directions:

  1. Preheat oven to 220°C.
  2. Combine eggs, flour, milk, salt, vanilla extract and sugar until smooth.
  3. Heat a 10-inch cast-iron skillet over medium heat.
  4. Place butter in the skillet, as soon as the butter has melted, add batter to the pan.
  5. Transfer the skillet to the pre-heated oven.
  6. Bake pancake until puffed and golden brown all over, about 15-20 minutes.
  7. Lower oven temperature to 150°C and bake five minutes longer. It will deflate as soon as it’s removed from the oven.
  8. Dust pancake generously with powdered sugar and top with 2-3 scoops of vanilla ice cream. Serve with blueberry compote.

For the blueberry compote: Combine the blueberries, sugar, 2 tablespoons of the lemon juice and zest in a saucepan over medium heat and cook until the sugar dissolves and the mixture is thick and syrupy, about 10 minutes.


Fettuccine with Black Truffle Cream Sauce

Still trying to process the shock, disgust, horror and anger I get from reading the news, both local and international.

As some of you may have noticed, I haven’t updated my blog/ Facebook for some time. I was, in the past few months, taking some major moves in my career. And I have been working my butt off to adjust to the transitions. In difficult times like this, I am particularly grateful for all the men in my life, who treat women with respect. I grew up getting all the education I needed; my father often reassures me that it is okay for a girl to be smart and ambitious. When I was too tired to cook after work, my husband would just get us takeaways, without the slightest complaint. I have never felt duty-bound to complete all the household chores, I needn’t be the domestic goddess of the house or the new Martha Stewart – I can just be myself!

Cooking has always been a meditating process for me; I feel a sense of tranquility and peace whenever I cook. Tonight, I felt something more – while I cooked, I thought of all the strong women in my life, starting with my mother, all my girlfriends… colleagues… Susan B Anthony… Claudette Colvin… Instead of feeling confined in a box, like many women before my time did, kitchen is a place where my dreams flourish. To me, food is the key to different cultures… Through all the kitchen experiments, I learn to be a person with an open mind.

So, I feel it really personally when I see how women are being demeaned, devalued and degraded publicly, how some leaders rule by intimidation, how they stifle opposing voices and diminish the potential of their citizens… it is just saddening to see how the world is moving backward…

I guess we all need a hearty truffle pasta like this to heal our souls.

dsc_0795


Ingredients:

  • 2 tablespoons unsalted butter
  • 1 tablespoons minced garlic
  • 8 ounces fresh fettucine
  • 1/2 to 1 cup heavy cream
  • 2 tablespoons truffle paste
  • Truffle shavings
  • 1 tablespoon of salt and 2 tablespoon of olive oil

Directions

  1. Add salt and olive oil to water, bring to a boil.
  2. Meanwhile cook garlic in butter over low heat.
  3. Add heavy cream and simmer until thickened.
  4. Cook pasta until al dente and add to cream; toss to coat.
  5. Whisk in truffle paste into pasta and remove from heat.
  6. Season with salt and serve with truffle shavings or fresh truffle.